Containerizing Node.js application – Part 2

In the previous part of this series, we looked at how one may go about to improve the build time of your Node.js Docker container. In this part, I will go more in depth with regard to the size of your container.
Why making your container lightweight
A good container image should be lightweight, for two reason: saving disk resource (obviously) & reduce data transfer. For a large, horizontally scaled application, its image might have to be transferred to hundreds, even thousands of different physical hosts for each deploy.
Therefore, a lightweight image will save you Gigabytes of data transfer, cut down your deployment time linearly or even exponentially (if you use a p2p image dissemination methods like Uber's Kraken or Dragonfly).
Note that by making sure your image is cached as much as possible, you also cut down on total storage usage & data transfer, because image are cached, reused & transferred by layer. So refer to the previous part of this series to see how we can improve layer caching.
Inspect your container
So how do you get more information of your image size?
First, you can get a total size of your whole image by just listing your image with docker
$ docker image ls

REPOSITORY   TAG       IMAGE ID       CREATED        SIZE
postgres     latest    f23dc7cd74bd   7 months ago   432MB
postgres     11.5      5f1485c70c9a   5 years ago    293MB
This command give you an overview, however, we may need to dig deeper into the sizes of layers, to see which layers are taking up the most space. For that, we use the docker history command instead.
$ docker history postgres:latest

IMAGE          CREATED        CREATED BY                                      SIZE      COMMENT
f23dc7cd74bd   7 months ago   CMD ["postgres"]                                0B        buildkit.dockerfile.v0
<missing>      7 months ago   EXPOSE map[5432/tcp:{}]                         0B        buildkit.dockerfile.v0
<missing>      7 months ago   STOPSIGNAL SIGINT                               0B        buildkit.dockerfile.v0
<missing>      7 months ago   ENTRYPOINT ["docker-entrypoint.sh"]             0B        buildkit.dockerfile.v0
<missing>      7 months ago   RUN /bin/sh -c ln -sT docker-ensure-initdb.s…   23B       buildkit.dockerfile.v0
<missing>      7 months ago   COPY docker-entrypoint.sh docker-ensure-init…   15kB      buildkit.dockerfile.v0
<missing>      7 months ago   VOLUME [/var/lib/postgresql/data]               0B        buildkit.dockerfile.v0
<missing>      7 months ago   RUN /bin/sh -c mkdir -p "$PGDATA" && chown -…   0B        buildkit.dockerfile.v0

...
This command allows you to see how much space each layer use, so you can focus on optimizing the right layers.
Now, if you prefer a more specialized utility for inspecting a Docker image, checkout dive. This program allows you to interactively browse a Docker image's content.
How to make your Image Lightweight
You should focus on two things while slimming down your image
- Use multi-stage build & only include files required for running the container in the final stage
- Delete unnecessary files in the same layer where it is created
Refresher on container image building
You are probably aware that container image are organized using a layered file system. Each layer records some files, and when those layers are stacked, we get the final file system state as a union of all those layers. A good analogy is a stack of transparent printed sheet stacked on top of each other.

So how do you make those layers? The image builder (BuildKit) set up an image building environment, then iterate over each command in the Dockerfile. After executing the command, the builder record what has been changed, then store it in a new layer.
Multi-stage build
Modern container image building tools now all support multi-stage build. This is a crucial feature for building a size-efficient image. The idea of multi-stage build is simple, you can process your files in a stage, then copy only processed files to the final stage. Only the final stage is recorded in the image.
Multi-stage build is very helpful with building a Node.js image with preprocessing, for example: TypeScript pre-compilation. Let's see an example where we don't have a multi-stage build.
FROM node:20
COPY package*.json . # copy package.json & package-lock.json
RUN npm clean-install
RUN npm run tsc # compile from typescript to plain javascript file
CMD ["node", "./dist/main.js"]
Now, this file will include a lot of things that are unneeded when it is run:
devDependencies- The original TypeScript source code.
- Any auxiliary files needed for the development process
We can do a better job with multi-stage build
# start with a builder stage
FROM node:20 AS builder
COPY package*.json
RUN npm clean-install
RUN npm run tsc

# prepare the final runner stage
FROM node:20 AS runner
COPY package*.json
RUN npm clean-install --omit=dev # do not install devDependencies
COPY --from=builder /dist dist
CMD ["node", "./dist/main.js"]
What we have achieved with this Dockerfile? We have excluded the following in the final stage:
- No
devDependenciesinstalled - The original TypeScript & any other auxiliary files are not copied over.
Does it matter? The result might seem small, we only save about a few megabytes of source code and some megabytes for devDependencies. This wouldn't give you too much of an advantage.
Todo: Example here
We can inspect this image with the dive utility, which give you the ability of peeking into the content of each layer. Your result may vary, but it is going to be something like this:
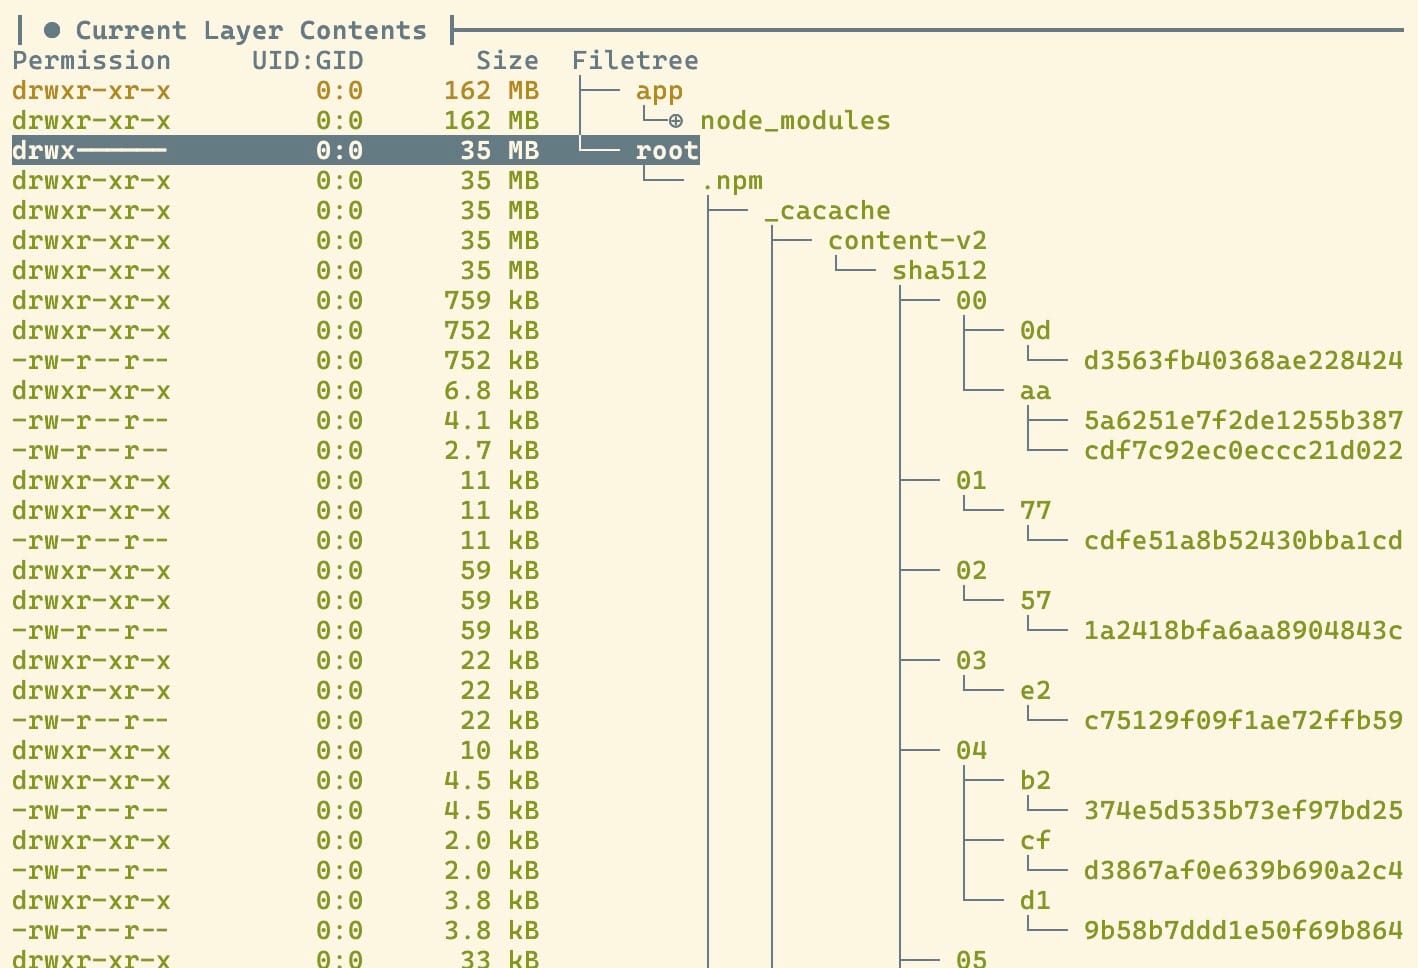
Ooh-la-la, what have we spotted. The npm cache folder is here, and it is taking up a considerable 20% of the image size. I can find information on the Internet saying a cache may take up to 80% of the image size. So, optimizing the cache should be a low-hanging size hack we can try. And this brings us to the next point.
Keep the cache out of the final image
For the specificity of a Node.js app, we would know that the npm cache is something we want to keep out of the final image. Additionally, this also applies to any other stack/language/framework you are using.
How do you deal with cache in a Docker image? You can:
- Disable cache
- Keep the cache, but clean it after use
- Mount the cache out of the building process.
Disabling cache
The first approach, disabling cache, is not plausible with npm or yarn, sadly. But keep this in mind if you also need to install OS dependencies with apk.
RUN apk add --no-cache ...Cleaning cache
If you cannot disable cache, then you should remove the cache right after installing dependency:
# npm
RUN npm clean-install && npm cache clean --force
# or remove specify a custom cache folder then delete it
RUN npm clean-install --cache /tmp/npm_cache && rm -rf /tmp/npm_cache

# yarn
RUN yarn install --frozen-lockfile && yarn cache clean

# apk
RUN apk add openssl && rm -rf /var/cache/apk/*

# apt
RUN apt install openssl && sudo apt-get clean
One thing you must remember, is to clean the cache in the same command where it is created. If you do it in two separate steps, the cache will still persist in the final image.
RUN npm clean-install
# the cache folder is committed in the previous step
# so deleting it in the next step doesn't keep it out of the final image
RUN npm cache clean --force
Don't do this
Mount out your cache (recommended)
We have already seen the option of mounting a cache volume into the build process. This approach combines the best of both worlds, where you get a persistent cache across build – saving your build time, and the cache is excluded from the final build image.
RUN --mount=type=cache,target=/tmp/npm_cache \
  npm clean-install --cache /tmp/npm_cache
This is such a groundbreaking move that will chop down your subsequent Docker build time to almost nothing. The only problem is that RUN mount is a new feature on some Docker image builder implementation, so you need to check with your CI pipeline's configuration to see if it supports this flag.


